|
While the trims available to the home sewer are endless in variety, there are basically just two ways to apply them. They are either topstitched to the garment or inserted into a seam. Which method to choose depends on where the trim appears in the garment and the character of your fabric and your trim.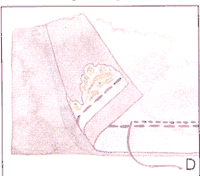
The Basics
If your trim has a decorative header or has two finished edges it can be topstitched in place.
Baste the trim in place before stitching-glue stick provides fast and easy holding power. Wait for the glue to thoroughly dry before proceeding, then carefully topstitch the trim in place along both edges of the header. To avoid shifting, stitch both edges in the same direction.
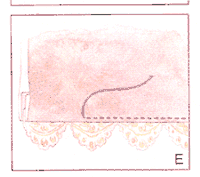
Trims with one flat edge (the header) and one decorative edge, such as fringe, feathers, and lace with one plain edge and one decorative edge, are designed to be inserted into a seam. Pin or glue-baste the trim in place along one seamline, matching the right side of the trim to the right side of the fabric. The header should be just inside the seam allowance. Machine-baste along the seamline, through the trim and the garment section. Then, pin the two garment sections right sides together, sandwiching the trim between the two pieces of fabric. Machine stitch the seam, sewing just outside the basting stitches. (D) Press seam allowances away from the trim and edge-stitch on the right of the fabric through all layers. (E)
 Fringe Fringe
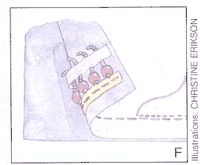
The insertion method is most often used to apply fringe to the edge of the garment. To keep the fringe tails from being caught in the stitching during application process, smooth them away from the seam allowance and temporarily secure them with masking tape (F). Remove the tape immediately after stitching to avoid marring the fabric. A zipper foot will keep fragile beaded fringe from being damaged and provide easier stitching.
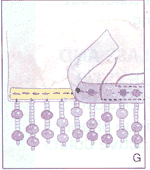 Many novelty fringes have a decorative ribbon header that allows them to be topstitched in place. If you can't find it in a combination that pleases you, create your own. Attach the base fringe first, then glue-baste and topstitch in coordinating ribbon on top. (G) Many novelty fringes have a decorative ribbon header that allows them to be topstitched in place. If you can't find it in a combination that pleases you, create your own. Attach the base fringe first, then glue-baste and topstitch in coordinating ribbon on top. (G)
Ribbons
Ribbon is most commonly used to decorate cuffs, collars, and hems. Ruched ribbon may be pressed flat, creating a box pleated effect, or left unpressed for a gathered appearance. The trim can be applied anywhere on the body of the garment or close to a finished edge. In both cases, the trim should be applied by topstitching it in place down the center, using either a straight or a decorative stitch. To add interest, try topstitching with a contrasting thread. If you are using a decorative stitch, make a sample first, using the same number and type of layers as on the finished layers as on the finished garment. If necessary, add a stabilizer for smoother stitching. Experiment with a non-woven tear-away under your work and or a clear plastic tear-off film such as HTC's Easy Stitch™ on top are your best bets.
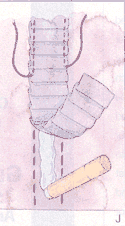 Narrow knife-pleated ribbons (5/8" to 1"/15mm to 2.5cm wide) can be used in a variety of imaginative ways. The pleats make the ribbon flexible, which means you can apply it in a straight line or mold it around curves. Careful handling is required to keep the pleats from being distorted as the trim is applied to the garment. For a topstitched application, machine baste two placement lines, slightly closer together than the width of your ribbon. Apply glue stick or Glue Baste-It™ - a basting glue that comes in a squeeze bottle with a syringe applicator for precise positioning, between the basting lines. Gently finger-press the ribbon in place, being careful not to flatten out the pleats. Once the glue is dry, topstitch along each edge, stitching in the same direction that the pleats fall. (J) Narrow knife-pleated ribbons (5/8" to 1"/15mm to 2.5cm wide) can be used in a variety of imaginative ways. The pleats make the ribbon flexible, which means you can apply it in a straight line or mold it around curves. Careful handling is required to keep the pleats from being distorted as the trim is applied to the garment. For a topstitched application, machine baste two placement lines, slightly closer together than the width of your ribbon. Apply glue stick or Glue Baste-It™ - a basting glue that comes in a squeeze bottle with a syringe applicator for precise positioning, between the basting lines. Gently finger-press the ribbon in place, being careful not to flatten out the pleats. Once the glue is dry, topstitch along each edge, stitching in the same direction that the pleats fall. (J)
For edgestitched application, machine-baste 1/8” to 1/4" (3mm to 6mm) from one finished edge of the ribbon, stitching in the direction that the pleats fall. Work slowly to avoid distorting the pleats. Before applying the trim to the garment, gently pull up on the basting stitches to re-establish the pleats.
 Beaded Bands and Applique’s Beaded Bands and Applique’s
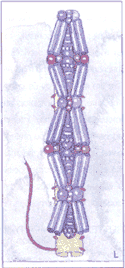
Because of their delicate nature, these exquisite trims need to be applied by hand. The elaborate versions consist of beads stitched in place on a sheer nylon ground. When the beading is very dense, the excess ground is trimmed away during the manufacturing process. However, some trims are designed so that the beads appear to float along the surface of the ground. To apply this type of trim, fold the nylon strip to the inside to that the raw edges meet at the center back. Pin the trim in place on the garment. Secure it with slipstitches, rolling the folded edges under as you work your way along the trim so that the nylon ground seams to disappear. (L)
Take Care
Although these trim may look like special occasion touches, many of them, particularly the fringed versions, are showing up on "everyday" fabrics, including knits and denims. While your denim garment may easily survive the washing machine, the trim itself may be another story.
To test for washability, make a sample, using the same trim, and fabric as in your garment. Put the sample in a pillowcase, twist the top, fold the twisted area down, in half, and secure with a rubber band. Wash on the gentle cycle. If the sample comes out fine, use this same method to clean the garment. Otherwise hand washing or a trip to the dry cleaners maybe in order.
Anne Marie Soto is a freelance writer and editor who has authored
many sewing-related articles and publications, including Vogue
Sewing for Children. Among her current projects,she serves as editor
for "Notions," the national newsletter of the American Sewing Guild.
|

