 Materials and Supplies Materials and Supplies
- Brother Embroidery Machine, ULT2001, ULT2002D, or ULT2003D
- 5" X 7" embroidery hoop, "Q" foot, "J" foot, and "R" foot
- Brother embroidery card #65
- Brother embroidery country thread #149
- Brother embroidery bobbin thread
- Brother Quilting foot SA129 & Shank adaptor SA132
- Top fabric: 1 piece of broadcloth 12" X 12"
- Fabric 16" X 16" for back of front panel
- 2 pieces of trim fabric 9" X 4"
- 2 pieces of trim fabric 16" X 4"
- 2 pieces of fabric for back 13" X 16"
- 1 piece of 4 ounce batting 6" X 8"
- Warm and Natural 16" X 16"
- Straight pins
- 24" ruler, rotary cutter, & cutting mat
- Embroidery scissors and seam ripper
- 1 piece of lightweight tear-away stabilizer 6" X 8"
- Neutral Mettler 100% quilting thread #703, or all purpose thread, and water-soluble thread
These project instructions are specific to a Brother Embroidery machine; however, the project can be adapted for use on other machines.
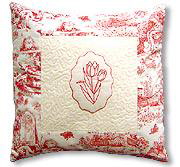
Embroidery Design with Trapunto
 1. Select the tulip design using Embroidery Edit. Touch SET, END. Select the frame patterns from the Select Pattern screen. Select the OVAL. Select the outline stitch pictured at right, touch SET. Rotate the design 90°, CLOSE. Touch SIZE and increase the size to 13.7 X 9.9. Touch CLOSE, END, SEWING. 1. Select the tulip design using Embroidery Edit. Touch SET, END. Select the frame patterns from the Select Pattern screen. Select the OVAL. Select the outline stitch pictured at right, touch SET. Rotate the design 90°, CLOSE. Touch SIZE and increase the size to 13.7 X 9.9. Touch CLOSE, END, SEWING.
2. Hoop the broadcloth, centering the fabric in the hoop. Slide the lightweight stabilizer under the hoop. Embroider the tulip design using the embroidery thread color #149 for a red work look. After embroidering the design, carefully remove the stabilizer. Do not remove the fabric from the hoop.
3. Place the 6" X 8" piece of batting under the hoop. Carefully place the hoop on the embroidery machine. Make sure the batting is laying flat under the hoop. Stitch the first color frame with thread #149 in the top, and embroidery bobbin thread in the bobbin. Do not stitch the second color frame of the selected frame pattern. Remove the hoop from the machine. Trim the excess batting from around the embroidered tulip design. Use caution not to cut the fabric.
4. Remove the fabric from the hoop.
Constructing the Trapunto pillow
1. Trim the square to 9" X 9".
2. Turn off the machine and remove the embroidery arm. Replace the embroidery "Q" foot with the "J" foot.
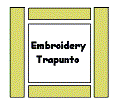
 3. Select the straight stitch 1-29. This stitch is used for a 1/4" seam with the "J" foot. The edge of the "J" foot will be your guide. Sew one of the 9" X 4" trim pieces to the top of the square and one to the bottom. (See diagram.) 3. Select the straight stitch 1-29. This stitch is used for a 1/4" seam with the "J" foot. The edge of the "J" foot will be your guide. Sew one of the 9" X 4" trim pieces to the top of the square and one to the bottom. (See diagram.)
4. Stitch the longer pieces of trim (16" X 4") to the sides of the square. (See above diagram.)
5. Position the finished piece on top of the Warm and Natural, then on top of the 16" X 16" piece of fabric. Pin in place or spray with temporary adhesive spray to hold in place.
6. Thread the machine with quilting thread on the top and in the bobbin. Place the "R" foot on the machine and stitch in the ditch on the embroidered fabric next to the trim pieces.
 7. Remove the "R" foot and place the shank adapter on the machine. Place the Quilting foot (darning foot) on the shank adapter. Select the running stitch in the center position and lengthen the stitch to 4.0mm. Drop the feed dogs. Free motion stipple around the Trapunto design. 7. Remove the "R" foot and place the shank adapter on the machine. Place the Quilting foot (darning foot) on the shank adapter. Select the running stitch in the center position and lengthen the stitch to 4.0mm. Drop the feed dogs. Free motion stipple around the Trapunto design.
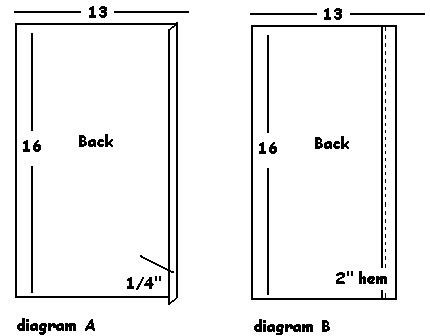
8. Turn under 1/4" on one of the 16" sides of each of the back pieces. Turn again 2" deep and stitch close to the edge. (See diagrams A and B.)
9. Place the back pieces on top of the finished piece right sides together, overlapping the hemmed edges, and matching raw edges. Change to the "J " foot and stitch around the outer edge using stitch 1-29.
10. Clip the corners on an angle and turn the pillow to the right side.
2/04
|

