|
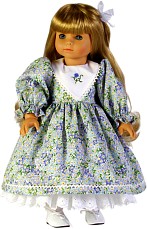
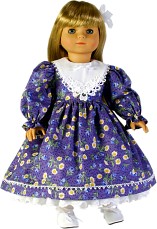
 This wonderful doll dress has many possibilities. You will learn many sewing techniques while creating the dress, slip, and doll panties. And you can select your own embellishment for the collar. We've created two versions for our sample. One is embroidered with a small flower motif and the other is embellished with a small lace motif. The dress fabric can be selected to best suit your 18" doll. This wonderful doll dress has many possibilities. You will learn many sewing techniques while creating the dress, slip, and doll panties. And you can select your own embellishment for the collar. We've created two versions for our sample. One is embroidered with a small flower motif and the other is embellished with a small lace motif. The dress fabric can be selected to best suit your 18" doll.
These project instructions are specific to the Janome machine; however, the project can be adapted for use on other machines.
Dress Patterns
Download dress patterns (patterns are 100% in size).
Janome Supplies Required
- Any Janome sewing machine
- Zigzag Foot A
- Satin Stitch Foot F
- 1/4 Foot O
- Hemmer Foot 2mm D
- Blue Tip needle 75/11
Janome Supplies for Embroidered Dress
- Memory Craft 10001, 10000, 9000, 5700
- Memory Card #25 (Small Flower Designs)
- MC8000 Embroidery Design Gallery CD ROM (MC10001, 10000)
 Clothsetter Clothsetter - Embroidery Foot P
- Embroidery hoop
- Janome Embroidery thread
- Janome Bobbin thread
Fabric and Notions Required
- 5/8 yard dress fabric
- 5/8 yard white or ecru batiste (for collar, slip, and panties)
- 1 yard of 2”-wide or 2-1/2”-wide gathered eyelet lace to match batiste
- 1-3/4 yard of 1/2”-wide Venice lace to match batiste
- 1 package of 1/8” elastic
- Sewing thread to match batiste
- Sewing thread to match dress fabric
- 6 snap fasteners
- Small appliqué or lace motif (or embroider on an 8"x8” piece of batiste)
- Stabilizer (optional)
- Fabric marking pen
Fabric Preparation
- Print out dress pattern, and cut out the pattern pieces.
- Cut a 10” x 40” rectangle from the dress fabric for the skirt.
- Cut two 2” x 15"” strips for the ties.
- Cut sleeves, bodice front, and bodice backs from the remaining dress fabric.
- Cut an 8” x 30” rectangle from the batiste for the slip skirt.
- Cut the collar, two slip bodice fronts, two slip bodice backs, and panties from the remaining fabric. Note: For a collar with an embroidered design, embroider a design from Memory Card #25 on an 8” square of batiste, then cut out collar. Cut a second collar from batiste.
- Cut a 1” x 7” bias strip from scraps.
Construct the Dress
Note – all seams are 1/4”.
1. Set up the sewing machine for Straight Stitch.
2. Attach the Satin Stitch Foot F.
3. Thread the machine with thread to match batiste.
4. For the collar, position the Venice lace along the seam line with the decorative edge of the lace pointing toward the garment and the heading along the seam line or cut edge. Stitch along the heading of the lace.
5. Place the second collar over the first, right sides together, with the lace sandwiched in between.
6. Stitch the collars together along the previous stitching line.
7.Trim the seam to 1/8”, and turn the collar right sides out. Press.
8. Sew the dress bodice front to the dress bodice backs at the shoulder seams.
9. Match the collar neckline to the dress neckline, and pin in place.
10. Fold the back facing over the collar, and pin in place.
11. Fold the bias strip in half lengthwise, and press.
12. With raw edges matching, place the bias strip along the neckline, and stitch with a 1/4” seam allowance. Trim off the excess length of the bias strip.
13. Trim and clip the seam, and turn the bias strip to the inside of the bodice as a facing. Stitch in place, making sure not to catch the collar.
14. Change the thread to match the dress fabric.
15. Attach the Hemmer Foot 2mm D.
16. Narrow hem the sleeves.
17.Attach the Satin Stitch Foot F.
18. Select the Zigzag Stitch. Adjust the width to 3.0 and length to 2.0.
19. Mark a 2-1/4” length of 1/8” elastic. Do not cut.
20. Stitch the elastic along the placement line: stitches should fall on each side of the elastic, not through it, allowing you to pull the elastic and to match the marks to each edge.
21. Stitch the ends of the elastic in place. Trim the elastic to match the
edge.
22. Attach the Zigzag Foot A.
23. Select Straight Stitch #1. Adjust the width to 0.0 and length to 5.0 for a basting stitch.
24. Sew two rows of gathering stitches between the notches of the sleeve cap.
25. Pull up the gathers to fit the armhole.
26. Adjust the stitch width to 3.5 and length to 2.2.
27. Stitch the sleeve to the armhole with a 1/4” seam.
28. Attach the Hemmer Foot 2mm D.
29. Narrow hem the long edges of the ties.
30. Turn under 1/4” on one short end, and press. Repeat for the second tie.
31. Fold the pressed end of the tie into a point by matching the pressed edge to the hemmed edge.
32. Attach the Zigzag Foot A.
33. Stitch the point in place. Repeat for the second tie.
34. Fold the opposite end of the tie into a small pleat. Pin in place as marked on the bodice front. Repeat for the second tie.
35. Matching the raw edges and the sleeve seams, stitch the side seams/underarm seams with a 1/4” seam allowance.
36. On the 10” x 40” rectangle for the skirt, mark a line 2” from one long edge.
37. Position the Venice lace along the marked line, with the decorative side of the lace pointing toward the garment. Stitch in place along the heading.
38. Attach the 1/4” Seam Foot O.
39. Fold along the stitching line, rolling the lace heading to the back, and press in place.
40. Topstitch 1/4” from the lace edging, guiding the edge of the foot along the edge of the fabric, creating a tuck.
41. Press the tuck toward the bottom edge.
42. Attach the Zigzag Foot A.
43. Press under 1/4” along the bottom edge, and press. Fold again 5/16”, and stitch in place.
44. Adjust the width and length for a basting stitch.
45. Sew two rows of gathering stitches along the top edge of the skirt.
46. Pull up the gathers to fit the bodice.
47. Adjust the width and length back to a standard straight stitch.
48. Sew the skirt to the bodice with a 1/4” seam.
49. Sew the center back seam from the hem to within 2” of the waist seam, using a 1/4” seam.
50. Sew three sets of snaps to close the back opening.
51. Embellish the collar with a small appliqué or small lace motif, hand stitching into place.
Construct the Slip
Note – all seams are 1/4”
1. Select Straight Stitch #1.
2. Attach the Zigzag Foot A.
3. Thread the machine with sewing thread to match batiste.
4.Sew the slip bodice fronts to the slip bodice backs at the shoulders, as shown here.
5. To create a bodice and bodice facing, start by folding the bodice backs in half, right sides together.
6. Match the neckline edges and shoulder seams. Pin in place.
7. Sew neckline with a 1/4” seam.
8. Match the armhole edges and stitch with a 1/4” seam.
9. Trim and clip the seams, and turn the bodice right side out.
10. Sew the side seams together to complete the faced bodice unit.
11. On the skirt of the slip, mark a line 1” from a long edge. Mark a second line 2” from the edge.
12. Fold and press along the marked lines.
13. Attach the 1/4” Seam Foot O.
14. Stitch along each fold, guiding along the edge of the foot to create a 1/4” tuck.
15. Attach the Zigzag Foot A.
16. Fold under 1/2” on each short end for the facing.
17. Adjust the stitch length to a basting stitch.
18. Sew two rows of gathering stitches along the top edge of the skirt.
19. Adjust the width and length back to a standard straight stitch.
20. Pull up the gathers to fit the bodice, and stitch in place with a 1/4” seam, keeping the bodice facing free.
21. Fold under 1/4” on the lower edge of the bodice facing, and hand stitch in place over the waistline seam.
22. Sew the center back seam from the lower edge of the eyelet to within 2” of the waist seam, using a 1/4” seam.
23. Sew three sets of snaps in position to close the back opening.
Construct the Panties
Note – all seams are 1/4”
1. Attach the Hemmer Foot 2mm D.
2. Narrow hem the leg edges of the panties.
3. Attach the Satin Stitch Foot F.
4. Select the Zigzag Stitch. Adjust the width to 3.0 and length to 2.0.
5. Mark a 4-1/2” length of 1/8” elastic for each leg.
6. Stitch the elastic to the leg, using the same technique used for the sleeves (Step 20 of Dress above).
7. Attach the Zigzag Foot A.
8. Select Straight Stitch #1.
9. Sew the front seam with a 1/4” seam allowance.
10. Fold down the top edge 1/4”, and press in place.
11. Fold again 1/4”, and press.
12. Edge stitch to create a casing.
13. Insert an 8” length of elastic into the casing, and secure the ends.
14. Stitch the back seam with 1/4” seam.
15. Stitch the crotch with a 1/4” seam, matching the seams and edges.
Project created by Michele Mishler
3/06
|

