|
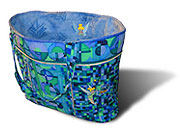
 Fabric bags are a fashion trend these days, and you can make this one in just an afternoon. We used Kwik Sew Pattern #3133. Fabric bags are a fashion trend these days, and you can make this one in just an afternoon. We used Kwik Sew Pattern #3133.
Instructions
1. Fuse the interfacing to the bands and bottoms.
2. Pin one pair of side panels to the center panel at the panel seams, matching notches, and stitch. Repeat for the other center and side panel pieces. (See Tips below to add piping.)
3. If you wish, this is a good time to embroider a design on one of the bag panels.
4. Pin band to panel section, right sides together, at band seam, matching notches, and stitch. Repeat for other bag sections.
5. Top stitch the band seam 1/8" away from the seam on the band.
6. Pin bag sections, right sides together, at side seams, matching side seams, and stitch.
7. Pin bottom to bag, right sides together, matching center notches and side notches to side seams. Stitch.
8. Pin lining, right sides together, at side seams. Stitch, leaving a 7" (17.8cm) opening on one side.
9. Embroider a small design at the top center of the bag lining - or add your monogram.
10. Use a 5"-wide band of fabric to add an interior pocket. Use the narrow hem foot to turn the upper edge. Stitch vertical seams to create pocket sections.
11. Pin lining bottom to lining bag, right sides together, matching center notches; match side notches to side seams. Stitch.
12. Fold handle in half lengthwise, right sides together, and stitch long edge. Press seam allowances open. Turn handle right side out. Placing seam in the center and matching seam to notches, press strap. Topstitch 1/8" (0.3cm) along each side of handle. Repeat for other handle.
13. Pin handles to right side of lining, matching notches, and stitch.
14. Pin lining to bag, right sides together, at top edge, matching side seams, and stitch. Turn bag right side out by pulling bag through opening in the lining.
15. Cut out a piece of heavy cardboard to match the shape of the bottom panel. Slip it through the opening between the lining and the bag and set at the bottom for added support.
16. Place lining inside bag and press. Fold under raw edges of opening and stitch together.
17. Edgestitch top of bag.
Tips
- Sew piping in the seams of the tote for added interest, using the piping foot.
- Using a 5-inch wide strip of fabric equal to the width of the bag, make a pocket for the interior of the bag. Use the narrow hem foot to turn the edges of the pocket quickly and easily . . . no more pins!
- Use the fringe foot to add embellishment to the bag.
- Use the cording foot to add a couching to one or two of the panels of the bag for added interest.
- Use the binder foot to attach binding to the pocket before it is attached.
- Use the adjustable blind hem foot for precise top stitching.
More Ideas
- After the three panels are constructed and the upper band is attached, cut out 2 pieces of a lightweight batting to match these panels and one to match the bottom of the bag. Create a quilt sandwich (batting and lining fabric) and follow the instructions for assembling the lining and the outer shell.
- Cut batting to match the straps, sew the batting to the seam, and then turn right side out.
- Make a 3-inch wide strap to insert in the upper seam, centered between the straps. Make a buttonhole in the strap and sew a button on the front of the bag.
- Make an extra pocket to add to the front of the bag.
Project developed by June Mellinger, Director of Education
5/04
|

