|
 Add life to simple denim using multi-colored thread and free-motion stitching. Make this trendy jacket to wear with almost anything, adding a subtle frayed trim along the collar and front opening. Add life to simple denim using multi-colored thread and free-motion stitching. Make this trendy jacket to wear with almost anything, adding a subtle frayed trim along the collar and front opening.
Supplies
- Simple, unlined jacket with no collar - Vogue #7947 was used in the sample shown
- Denim yardage according to the pattern envelope
- YLI Jeans Stitch thread (Traditional Variegated – 03V-VA)
- Jeans Needle Size 90/14
- Mettler 50/3 Silk Finish Cotton thread in color to match denim fabric
- BERNINA® Stitch Regulator Foot #42 (BSR)
- BERNINA® machine that supports the BERNINA® Stitch Regulator feature; either an artista 730/640/630; an aurora 430/440QE; or an upgraded artista 200. Note: For other machines, select your favorite free-motion foot
- Pattern tracing material
These project instructions are specific to a Bernina sewing machine; however, the project can be adapted for use on other machines.
Instructions
1. Preshrink denim fabric.
2. Cut out pattern pieces in desired size.
3. Trace right front pattern piece onto the pattern tracing material.
4. If the pattern has a built-in front facing, cut it off on the fold line and add a ⅝” seam allowance to both the front piece and the facing piece.
5. Lay out all pattern pieces on the fabric and cut rectangles of fabric that are at least 1” larger than the pattern piece on all sides.
 6. Insert a Size 90/14 Jeans needle and thread with Jeans Stitch thread. 6. Insert a Size 90/14 Jeans needle and thread with Jeans Stitch thread.
7. Wind bobbin of Mettler 50/3 Silk Finish cotton thread.
8. Do a test-sew and adjust tension as needed.
9. Attach the BERNINA® Stitch Regulator Foot #42 and set up the machine as per manual.
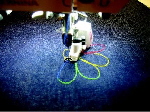
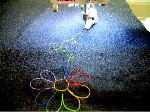
10. No need to mark design on fabric. Sew about a ½” circle and then begin sewing petals until the entire circle has petals attached. To proceed to the next flower, simply sew some “squiggles” as you move on to another flower.
11. Continue until the entire piece of fabric is covered with freemotion stitched flowers. Note: Facings do not need to be embellished.
 12. Lay pattern pieces out on embellished fabric; cut. 12. Lay pattern pieces out on embellished fabric; cut.
13. Cut a 1” wide strip of fabric the length of the collar piece. Cut another strip 1” wide by the length of the right front piece. Make sure that these strips are cut on the true grain of the fabric. Note: If trim is cut on the crosswise grain, the fringe will be white; if cut on the lengthwise grain it will be blue.
14. Construct the jacket using the pattern instructions with the following exceptions:
COLLAR: Insert the 1” strip of denim into the seam when sewing the two pieces of the collar together. Trim and turn right sides out; fray the strip of fabric.RIGHT FRONT: Insert the remaining 1” denim strip between the right front and the right front
facing before sewing. Sew together with a ⅝” seam. Trim and turn right sides out; fray the strip.
15. When jacket is complete, wash and tumble dry to enhance the look of the frayed trim.
By Barbara Alenci
Originally published in Through The Needle Issue 17
6/07
|

