|
 This project has been developed for a Singer® QUANTUMLOCK® 14T957DC Overlock Machine; however, the project can be adapted to other machines. This project has been developed for a Singer® QUANTUMLOCK® 14T957DC Overlock Machine; however, the project can be adapted to other machines.
Materials Needed
- 1 yard (.91 meter) off-white satin
- 1 yard (.91 meter) textured jacquard
- 1/3 yard (.30 meter) silk dupioni or solid decorative fabric
- 1 yard (.91 meter) lightweight iron-on stabilizer
- 1 yard (.91 meter) 1/4" (.6 cm) white stringed pearls
- 1 yard (.91 meter) 1/2" (1.3 cm) off-white organza ribbon
- 1 spool 6 weight decorative off-white rayon thread
- 3 spools off-white overlock thread
- 3 spools 40 weight rayon thread, a shade darker than satin fabric
- 2-1/4 yards (2 meters) cording
- 18" pillow form
Fabric Preparation and Set Up
Press stabilizer on to the wrong side of satin.
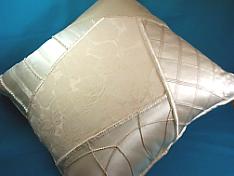
Use an 18" (45.7 cm) square of paper to develop pattern. Draw lines (see illustrations), and cut apart pattern sections. From satin, cut one of each pattern piece, making sure you add 5/8” (1.6 cm) seam allowance to all sides of pattern as you cut.
Cut a 19-1/4” (48.9 cm) square out of the textured jacquard for pillow back.
Block 1 - Chain Stitch
Fabric: Satin
Overlock Setup: Chain stitch
Thread: Needle - regular overlock thread; Looper - 6 weight decorative rayon thread
See manual (pages 20, 23, 39 & 40) for threading and "how to" instructions.
With marking pen, mark decorative stitching lines on the wrong side of stabilized fabric. Using the chain stitch, sew along these marked lines; the chain stitch will appear on the right side.
Block 2 - Triple Cover Hem Stitch
Fabric: Satin
Overlock Setup: Triple cover hem stitch
Thread: Loopers - regular overlock thread; Needles - 40 weight rayon thread
See manual (pages 25-29 & 52) for threading and "how to" instructions.
With marking pen, mark decorative stitching lines on the right side stabilized fabric. Using the triple cover hem stitch, sew along the marked lines.
Block 3 - Alternating Rows of Beading & Double Cover Hem Stitch
Fabric: Satin
Overlock Setup: Double cover hem stitch (to attach organza ribbon)
Thread: Regular overlock thread
See manual (pages 25-29 & 51) for threading and "how to" instructions. Do not thread middle (blue) needle.
With marking pen, mark lines 2" (5.1 cm) apart on the right side of stabilized fabric. Starting with second row, sew the organza ribbon along the marked lines using the double cover hem stitch; continue to sew the organza on alternating rows.
Overlock Setup: Two-thread flatlock (to attach pearls)
Thread: Regular overlock
See manual (pages 18, 23, 36 & 44) for flatlock sewing. Thread left (orange) needle and lower (red) looper only.
Fold fabric along marked lines and attach pearls using the flatlock stitch and the pearl foot.
Block 4 Silk & Block 5 Jacquard
These blocks have no embellishments.
Constructing the Pillow
Join all pieces wrong sides together, using a two-thread flatlock stitch, and using regular thread in needle and 6 weight decorative rayon in lower looper. See manual (pages 18, 23, 36 & 44) for threading instructions. Thread left (orange) needle & lower (red) looper only.
To cover cording, cut bias strips of satin. Use the optional cording foot to construct and assemble cording. Sew cording to right side of pillow.
To complete, place pillow front and pillow back right sides together and sew all sides, leaving an opening large enough to insert pillow form. Turn right side out, insert pillow, and hand stitch opening closed.
|

