|
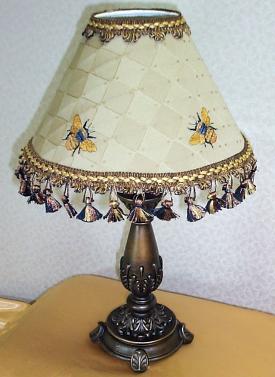
 A fun addition to your décor! A fun addition to your décor!
Materials needed
- Self-adhesive lampshade (available at fabric, interior design, or sewing supply stores)
- Upholstery fabric (see yardage requirements on lampshade packaging)
- Embroidery thread in the following colors: Black, gold, rust, brown, mustard, grey and white
- White or black Bobbinfil thread for bobbin (this is a very fine thread used in the bobbin; sewing supply stores carry it)
- Tear-away stabilizer
- Tassel fringe for the bottom edge of the lampshade
- Coordinating flat trim for top edge of lampshade
- Glue gun and glue stick
- Download Busy Bee Design
Important Note: These project instructions are specific to the QUANTUM® Futura™ CE-200 or Futura™ CE-100 machine; however, the project can be adapted for use on other machines.
Instructions
Preparation
1. Carefully remove paper wrapping around lampshade without tearing it. The lampshade will now have a very sticky finish; be sure to place it in a safe area.
2. Place the paper template you removed from the lampshade onto your fabric, and trace the outline using chalk or a marking pencil. Do not cut out your fabric until after you have completed the embroidery.
3. Using a marking pencil, mark the center of where you will position each bumblebee. On a 12-inch shade, we placed our bees 2 inches from the bottom edge and spaced them 4 inches apart.
4. Thread machine with bobbinfil in the bobbin and black embroidery thread in the needle.
5. Hoop fabric along with stabilizer in the large hoop, making sure that one of your pencil marks is centered in the hoop.
Sewing
1. Send the first block of color (black) to the machine. (See the software built-in tutorial if needed to transmit design to the machine.)
2. Attach hoop to embroidery unit.
3. Sew out one complete bumblebee following the prompts from the machine to transmit all color blocks. (There will be a total of seven color blocks to send.)
4. Remove fabric from hoop and reposition fabric to center the next pencil mark in the center of the hoop.
5. Rotate the bumblebee 90 degrees to the right on your computer screen. (See built-in tutorial for how to rotate.)
6. Sew out one complete bumblebee following the prompts, transmitting all color blocks.
7. Continue embroidering bumblebees along the lampshade edge following the markings you have made, and rotating the bumblebees 90 degrees to the right for every new bumblebee that you embroider.
Finishing
1. Using the paper template that you removed from the lampshade, cut out the fabric.
2. With a hot iron, press under the two short edges of the fabric 1/4”.
3. Place fabric on sticky lampshade and press into place.
4. Using glue gun, run a small strip of glue along one of the edges that you pressed, and lay the other edge over top of it. Press firmly in place with your finger.
5. Run a strip of glue along the bottom edge of the lampshade; then quickly lay the tasseled fringe over top of it. Press firmly in place with your finger.
6. Repeat this procedure for the top edge of lampshade, this time using the flat trim.
1/05
|

